
How to Take Long iPhone Screenshots. On the iPhone, taking a screenshot is a simple process that everyone is familiar with.
You simply need to press the volume up button as well as one of the side buttons at the same time to take a screenshot, and you will get exactly what is displayed on your screen.
However, if you are also seeking to capture information that is located above or below what is displayed on the screen, then the screenshots you took may not be sufficient.
The iOS operating system contains a function known as scrolling screenshots, which enables users to capture many pages with only a single screenshot.
There are applications available from third-party developers that allow you to piece together multiple screenshots into a single longer image; however, taking a screenshot that scrolls makes the process much simpler.
Here’s everything you need to know to snap scrolling screenshots on your iPhone, whether you want to save a film script in Safari or a long PDF in your email. If you want to save a film screenplay in Safari or a long PDF in your email.
Check out this devious technique to surreptitiously message someone else on iOS, as well as the hidden trackpad that lurks in your iOS keyboard, if you’re interested in learning about additional hidden features of iOS, which you should be if you’re reading this.
What is a scrolling screenshot?
A full-page screenshot, also known as a scrolling screenshot, is a snapshot that captures a whole page of content, such as a website, document, or email, without requiring the user to take individual screenshots that must then be pieced together.
If you wanted to take a screenshot of a document that was 116 pages long, for instance, but you were using Safari, you would only need to take a single screenshot to get the whole thing.
How to take a scrolling screenshot on your iPhone
Follow these steps to capture a screenshot of the scrolling content on your screen:
1. First, take a regular screenshot on your iPhone. If you have Face ID, quickly press the side button + volume up button. With Touch ID, it’s side/top button + home button.
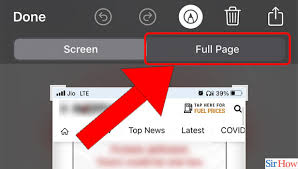
2. Tap the screenshot preview that appears in the bottom-left corner. It appears for about five seconds, so you must be somewhat swift.
3. Next, go to the Full Page option. Underneath Full Page, you’ll see a preview of the entire scrolling screenshot on the right side, along with a larger preview in the middle. You also have tools to crop the scrolling screenshot, in case it’s too long.
4. Once you’re finished editing the scrolling screenshot, hit Done. You’ll see two options: one to save the scrolling screenshot and another to delete it.
5. Finally, tap Save PDF to Files to save the scrolling screenshot.
You will be prompted to select a folder before the scrolling screenshot can be saved. The Downloads folder or the location where you most recently saved something will be chosen by the Files app as the default location.
How to view scrolling screenshots on your iPhone
Each scrolling screenshot is exported as a PDF before being stored in the system’s default Files application.
Launch the Files app, navigate to the location where you saved your screenshot, and then choose it from the list of available files to see your scrolling screenshot.
In this section, you will find options to rename the file, draw on it, add comments, and more. You may also choose to send the scrolling screenshot; however, the recipient will need Files or another PDF reader in order to view it.
How to take a Screenshot on iPhone X, iPhone Xs and iPhone Xr devices
The steps outlined in this article will walk you through how to easily capture a screenshot of the display on your iPhone X, iPhone Xs, iPhone Xs Max, or even an iPhone Xr handset. If you have one of these models, read on.
- Place a finger on the Sleep/Wake button on the right edge of your iPhone
- Place another finger on the Volume Up button on the left edge of your iPhone.
- Simultaneously press both these buttons, and wait till you hear a confirmation sound and your device screen will flash once briefly.
- If your device is running iOS 11 or later on your device, the screenshot you’ve just taken will shrink down to the bottom of the screen, where you can take any action on it directly, such as sharing it with anyone or cropping it to any size you want.
- If no action is taken, the iPhone X screenshot is automatically saved to the Camera Roll.
For devices running older versions of iOS, you won’t see a thumbnail preview, but the screenshot is automatically saved to your Camera Roll.
How to take a Screenshot on iPhone 5(s), iPhone 6(s), iPhone 7/7 Plus and iPhone 8/8 Plus devices
This guide will walk you through how to save a copy of your iPhone screen and take a screenshot for future reference if your iPhone is from any of the versions of iPhones listed above. Don’t worry, the procedure is just as simple as it is on more recent iPhones; the only difference is that the buttons are arranged differently.
- Place a finger on the Home button at the bottom of the screen.
- Place another finger on the Volume Up button.
- Press both buttons simultaneously, and wait till you hear a confirmation sound and notice the screen flash briefly.
- If your device is running iOS 11 or later on your device, the screenshot you’ve just taken will
- shrink down to the bottom of the screen, where you can take any action on it directly, such as sharing it with anyone or cropping it to any size you want.
- If no action is taken, the screenshot is automatically saved to the Camera Roll.
For devices running older versions of iOS, you won’t see a thumbnail preview, but the screenshot is automatically saved to your Camera Roll.
How to Take Long iPhone Screenshots 2024:Newshub360.net
Related Post
Credit :www.Newshub360.net

